

Squadron Strike
Any Ship, Any Universe, Fully 3D
Have you ever wanted to take ships from different universes and see who’d win? If you can imagine it, Squadron Strike lets you build it, then fight it out on the table with your friends. Squadron Strike combines the most detailed ship construction system on the market - it can faithfully reproduce ships from Star Fleet Battles or Babylon 5 Wars - and mates them to a fast-playing tactical engine that includes full 3D maneuver and firing arcs.
If you can't wait to get into the fight, the boxed set comes with the Human Diaspora setting, which also has miniatures available for it. We have more settings in the works.

For typical games of two to four ships per player in 3D, game turns run at 6-15 minutes, depending on the subsystems chosen. In 2D, you can run about three times as many ships in the same period of time, and in 2D, speed of play is comparable to Starmada: Admiralty Edition or Colonial Battlefleet. 3D play is built off of the same set of core mechanics used in Attack Vector: Tactical, with a simultaneous pre-plot/whole turn movement engine, and the fastest damage allocation system on the market, all built off of a rigorously balanced ship design system that takes you from selecting genre assumptions through printing out beautifully formatted Ship System Displays.

- Ideal Scale: Two to six ships per player.
- Recommended Ages: 12+
- Time to Play: 2-3 hours.
- Time to Learn: 1-2 hours.
Features
- A comprehensive tutorial makes it fun and easy to learn the game in stages
- Full-turn movement with future position markers, allowing you to plan strategy in broad strokes
- Altitude and attitude markers that let you visualize your ship’s pitch and roll on the board.
- Three different families of weapons (beams, torpedoes and missiles) each with different roles in the battlespace. Over 300 weapon traits that can be combined.
- Three different movement modes - no momentum, cinematic movement and full vector - that can all play on the same map together, with optional rules for fuel tracking.
- Five primary defensive technologies (two kinds of shields, internal and external armour, and ECM) plus a wide range of advanced options including prismatic globes, ebon globes and and two different kinds of cloaking devices
- Facilitates the design and use of fighters, mecha, shuttles and battle riders without making them necessary for success.
Space Combat With Depth!
Squadron Strike is a 3-D tactical combat system with the most robust ship design system on the market. You can make any ship, from any universe, and fly it in a fully 3-D combat environment. Through the use of different movement modes (named after the number of Newton’s Laws being obeyed) you can add as much (or as little) respect for the laws of physics as you like.
Every graphic in this explanation is here for a specific purpose; look at all of them when they’re referenced in the text.
Map Display
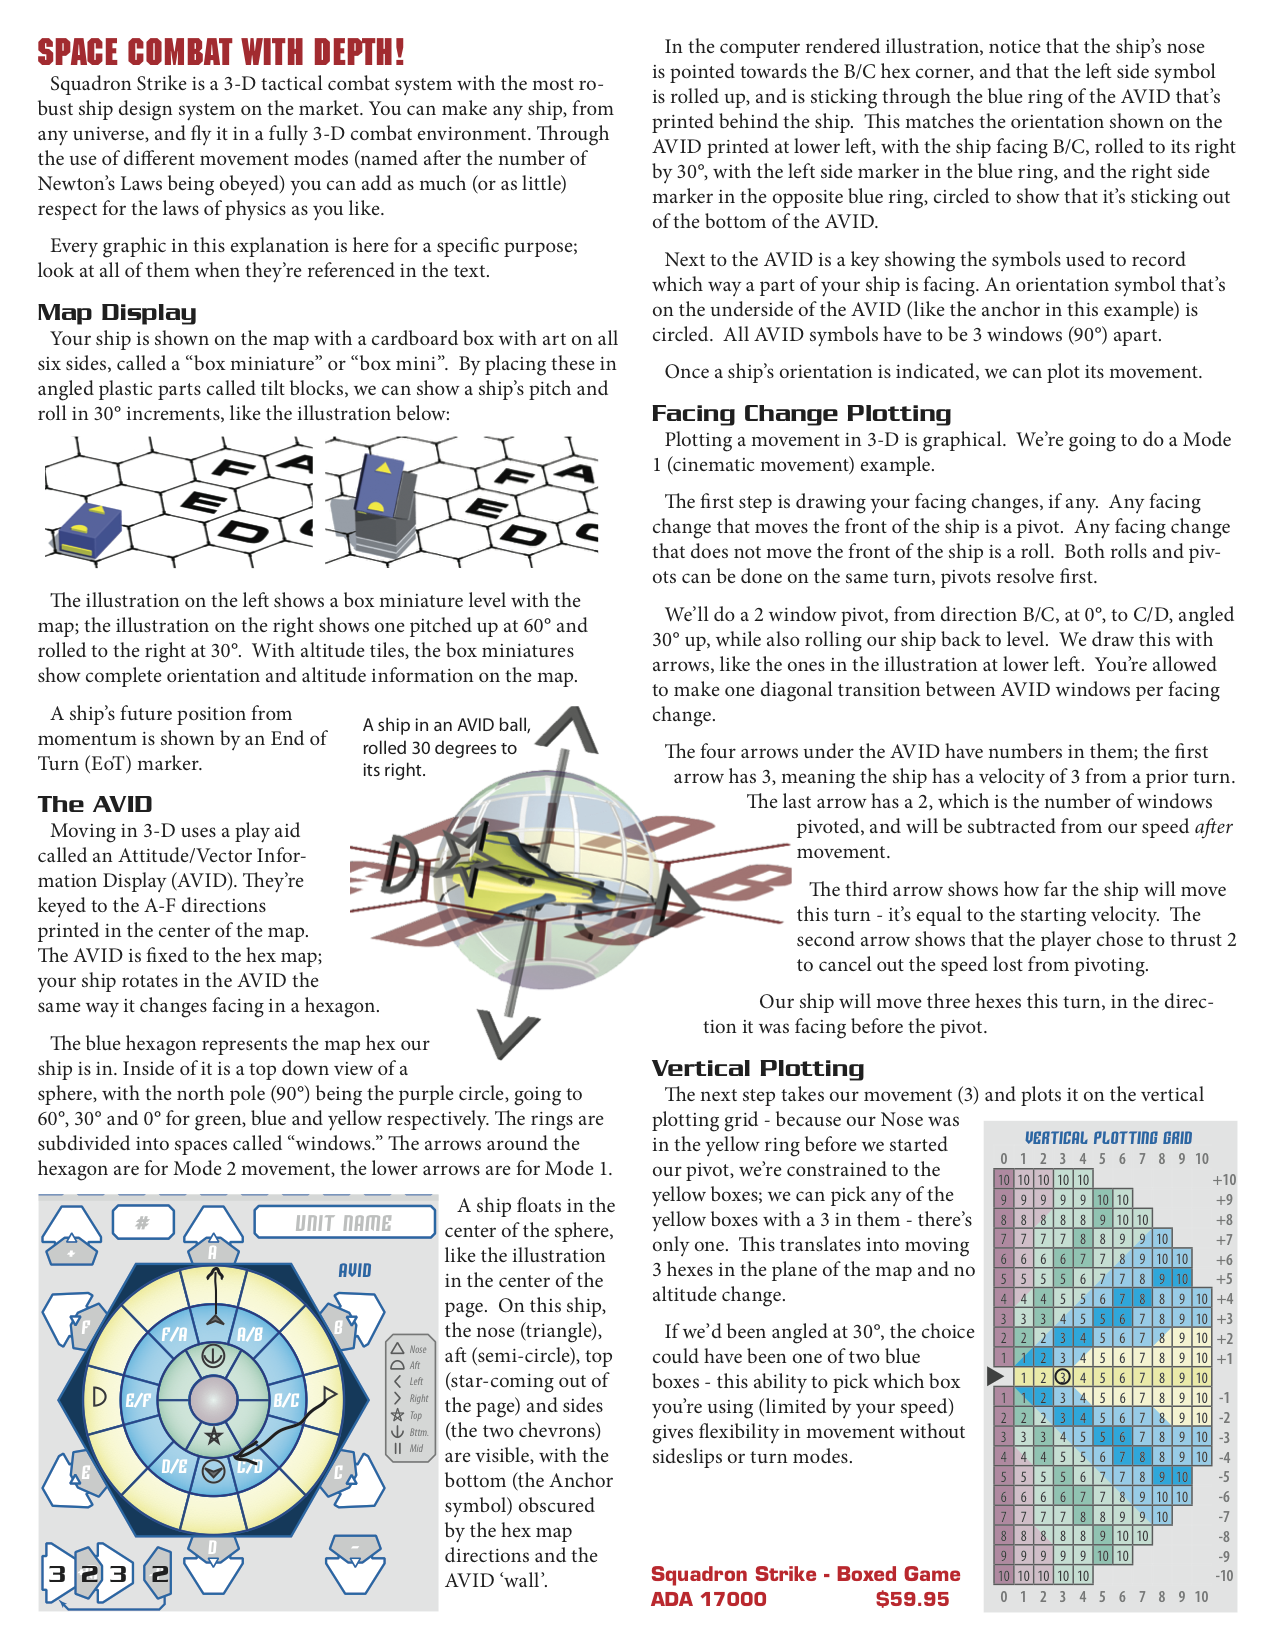
Your ship is shown on the map with a cardboard box with art on all six sides, called a “box miniature” or “box mini”. By placing these in angled plastic parts called tilt blocks, we can show a ship’s pitch and roll in 30° increments, like the illustration below:
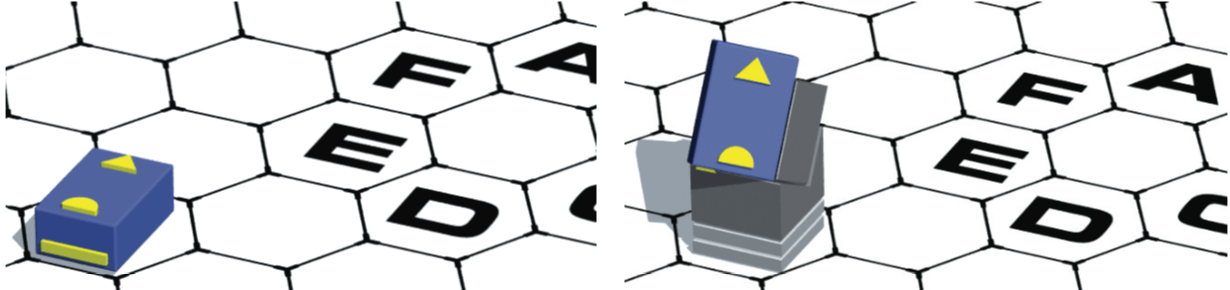
The illustration on the left shows a box miniature level with the map; the illustration on the right shows one pitched up at 60° and rolled to the right at 30°. With altitude tiles, the box miniatures show complete orientation and altitude information on the map.
A ship’s future position from momentum is shown by an End of Turn (EoT) marker.
The AVID
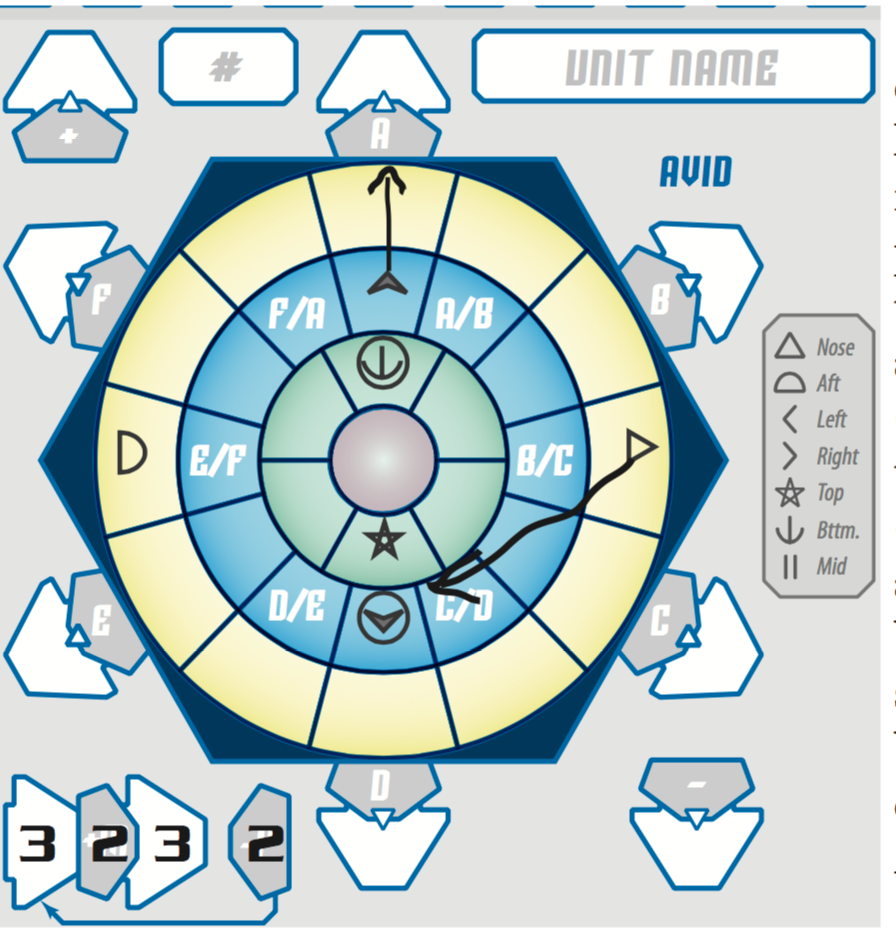
Moving in 3-D uses a play aid called an Attitude/Vector Information Display (AVID). They’re keyed to the A-F directions printed in the center of the map. The AVID is fixed to the hex map; your ship rotates in the AVID the same way it changes facing in a hexagon.
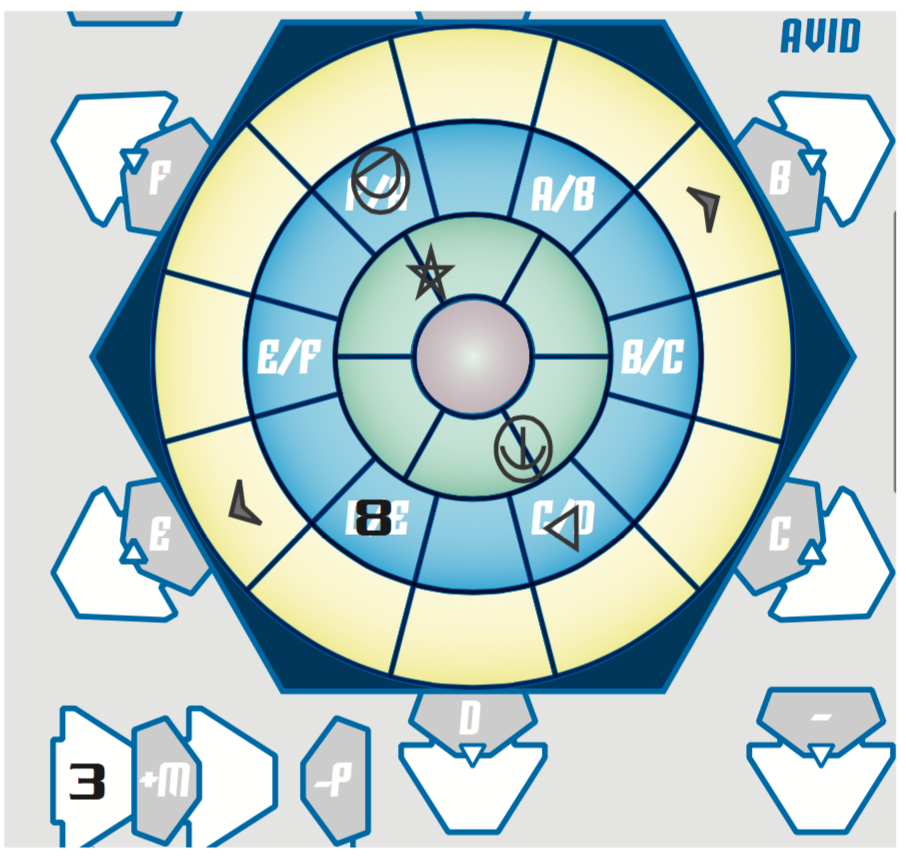
The blue hexagon represents the map hex our ship is in. Inside of it is a top down view of a sphere, with the north pole (90°) being the purple circle, going to 60°, 30° and 0° for green, blue and yellow respectively. The rings are subdivided into spaces called “windows.” The arrows around the hexagon are for Mode 2 movement, the lower arrows are for Mode 1.
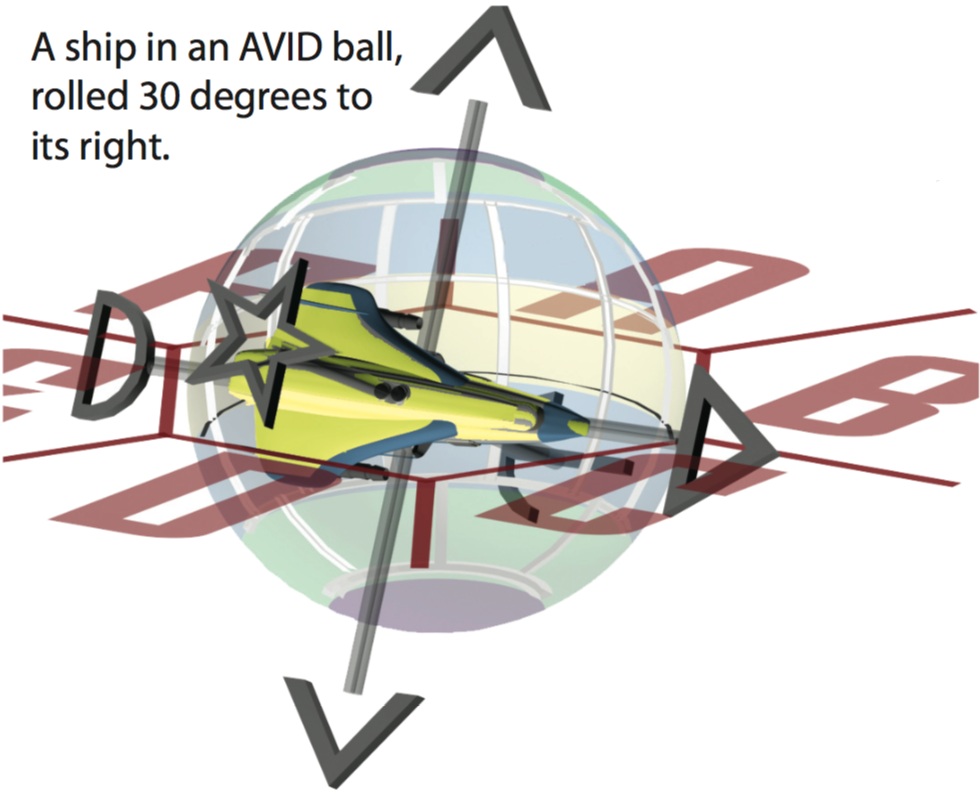
A ship floats in the center of the sphere, like the illustration in the center of the page. On this ship, the nose (triangle), aft (semi-circle), top (star-coming out of the page) and sides (the two chevrons) are visible, with the bottom (the Anchor symbol) obscured by the hex map directions and the AVID ‘wall’.
In the computer rendered illustration, notice that the ship’s nose is pointed towards the B/C hex corner, and that the left side symbol is rolled up, and is sticking through the blue ring of the AVID that’s printed behind the ship. This matches the orientation shown on the AVID printed at lower left, with the ship facing B/C, rolled to its right by 30°, with the left side marker in the blue ring, and the right side marker in the opposite blue ring, circled to show that it’s sticking out of the bottom of the AVID.
Next to the AVID is a key showing the symbols used to record which way a part of your ship is facing. An orientation symbol that’s on the underside of the AVID (like the anchor in this example) is circled. All AVID symbols have to be 3 windows (90°) apart.
Once a ship’s orientation is indicated, we can plot its movement.
Facing Change Plotting
Plotting a movement in 3-D is graphical. We’re going to do a Mode 1 (cinematic movement) example.
The first step is drawing your facing changes, if any. Any facing change that moves the front of the ship is a pivot. Any facing change that does not move the front of the ship is a roll. Both rolls and pivots can be done on the same turn, pivots resolve first.
We’ll do a 2 window pivot, from direction B/C, at 0°, to C/D, angled 30° up, while also rolling our ship back to level. We draw this with arrows, like the ones in the illustration at lower left. You’re allowed to make one diagonal transition between AVID windows per facing change.
The four arrows under the AVID have numbers in them; the first arrow has 3, meaning the ship has a velocity Fof 3 from a prior turn. The last arrow has a 2, which is the number of windows pivoted, and will be subtracted from our speed after movement.
The third arrow shows how far the ship will move this turn - it’s equal to the starting velocity. The second arrow shows that the player chose to thrust 2 to cancel out the speed lost from pivoting.
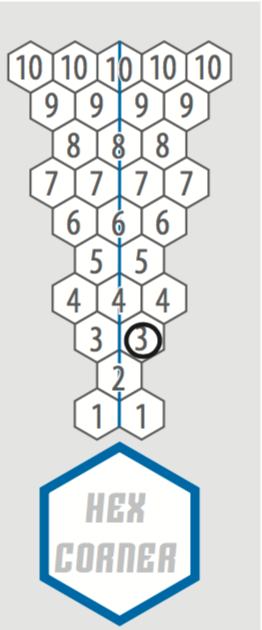
Vertical Plotting
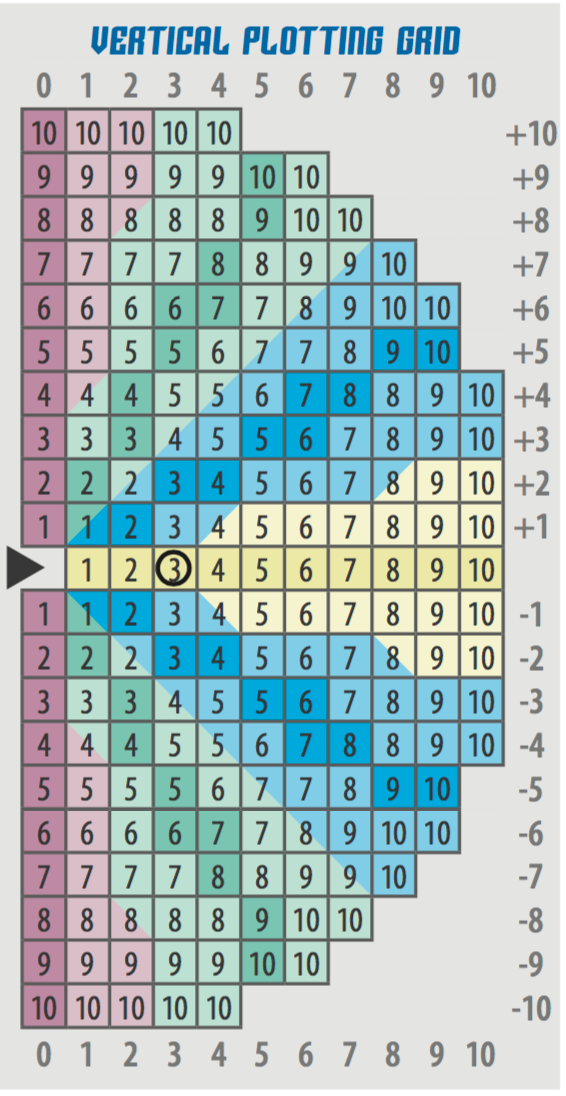
The next step takes our movement (3) and plots it on the vertical plotting grid - because our Nose was in the yellow ring before we started our pivot, we’re constrained to the yellow boxes; we can pick any of the yellow boxes with a 3 in them - there’s only one. This translates into moving 3 hexes in the plane of the map and no altitude change.
If we’d been angled at 30°, the choice could have been one of two blue boxes - this ability to pick which box you’re using (limited by your speed) gives flexibility in movement without sideslips or turn modes.
Horizontal Plotting
Once the vertical plot is done, it’s time to do the horizontal plot. Our movement is on the hex spine between directions B and C on the hex map, and we pick the exact hex we move into.
We know we are moving three hexes in the plane of the map from the vertical plotting step, so we can pick any hexagon with a 3 in it. We have 2 to choose from and take the one on the right (shifting a bit in direction C on the map plane). We place our future position marker in accordance with our plot.
Once everyone has placed their future position markers, all units move, completing any pivots.
After movement, we subtract one from our speed for every window we pivoted, and add one to our speed for every level of thrust plotted. In this case, they cancel out, and we start next turn facing direction C/D angled up at a 30° angle, with no roll, and an initial velocity of 3, as is shown on the AVID below. We select the deep blue cell with the number 3 on the vertical plotting grid, and one of the hexagons with a 3 in it, to put our End of Turn (EoT) marker where we'll be if nothing changes on the next turn's move.
Shooting Bearings
The AVID is part of a 3-D firing arc solution. Finding the window a target is visible through is called shooting a bearing.
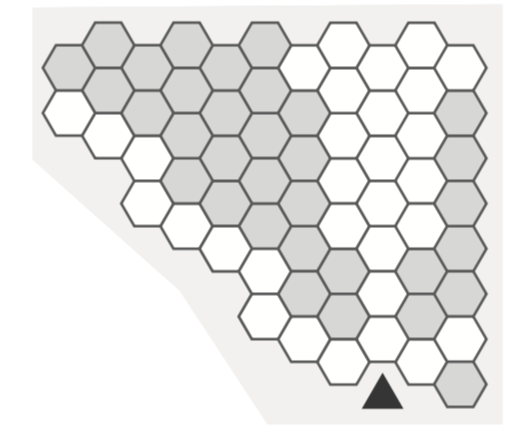
Shooting a bearing is a multi-step process: Check if a target is visible through a hex side or a hex corner. If you think of the AVID as being sliced like the wedges of an orange, this will tell you which wedge you see the target in. If the target is 3x as far away in one map direction as it is in the other, it's visible through that map direction. Otherwise, it's visible through a hex corner.
The horizontal bearing illustration shades hexes according to this rule, with the triangle representing our ship. Of the target's hex is in a gray zone, it's on a hex corner; otherwise, it's on a hex side.

For the rest of this example, we're going to shoot a bearing to the target whown with the circle on the hex map at right, while the skized spaceship is our ship, having completed the pivot we drew on the last page - it's facing the C/D hex corner at altitude level 0, with it's nose up in the blue ring. Counting hexes, it's 2 hexes away om D and 5 hexes away in E. Using the tool shown above, that means we see it on the D/E hex corner relative to our ship. The +4 in the circle means it's 4 hexes above us.
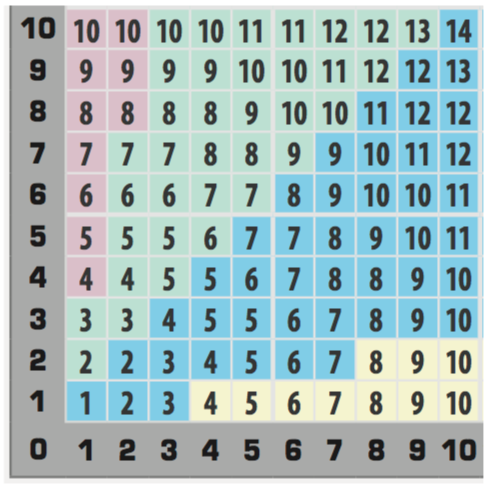
Next, we count the distance to the target on the hex map, and the difference in altitude. We'll use these numbers on the Range/Altitude Lookup Table (RALT). Br cross-referencing the difference in altitude with the map distance, the number willgive us the range to the target, while the celkl color thells us the AVID ring it's visible through.
Extending our example, a target 7 hexes out, with 4 hexes of altitude difference would be visible through the blue ring, at range 8.
Combining all the steps, we'd write the range to the target in the blue window facing the D/E hex spine, like we've shown on the AVID at right.
Now we need to see what weapons can shoot the target. The next illustration has firing arcs for mounts S, T and U.
Firing Arcs

Where the AVID is a top-dwon view of a sphere fixed to the map, firing arcs are a sphere ixed to your ship, with the top of the ship at the top of the diagram. When looking at firing arcs, we use the same symbols for Nose, Aft, Left, and Right as we did on the AVID.
Count from the top of our ship on the AVID (the star) to the target bearing (the number 8). This comes to two or three windows, because the star is on a spine, meaning the attacker gets to choose. We'll treat it as two windowns down from the top, putting the target's bearing two rows down from the top window.

Next, count from the closest orientation marker onthe AVID to the bearing (the right side marker). The target is one window away from the right marker, diagonally towards the nose and up. We'll count the same way on the firing arc diagram. If the resulting cell is white, the weapon can shoot.
Our ship sees the target in the cell outlined in red on the diagrams to the right. Mounts S and U can shoot, but T can't.
To fire a weapon, find the range to the target on a weapon table ad read across. Shading on the range column beans it takes Action Points to fire the weapon. The second column is target number you need to equal or exceed to hit the target on a 1-sided die (d10).
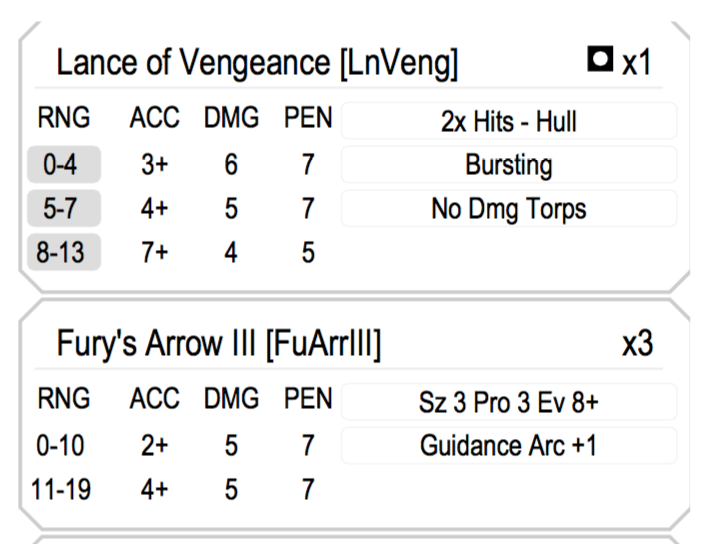
The third column shows the static damage the weapon does every time it hits. The fourth column gives the maximum damage from a special die roll called 2d10-, where 2d10 are rolled ane the lesser result is subtracted from the greater.
A fourth d10 tells the target what part of the ship is hit, and all of these dice can be rolled at once to save time, calling out "Hit, 8 points to location 7."
Settings
Empire/Directorate War - Included in the Squadron Strike Box Set
First Contact between the Empire of Brasil and the Directorate of Sapiency happened in 1939. The Directorate did technology transfers to help the Brasilians conquer the rest of the planet, and offered the Earthers a seat in the Directorate. The Empire of Brasil refused this offer, and went on a conquering spree…
Star’s Reach - Coming Soon
In a universe where the anarchic Human Commonwealth has expanded into space, there’s precious little regulation of where humans go. Admiral Caroline Weber-Smith has been called upon to support a bunch of investors far outside the scope of human space. Little did she know she’d get embroiled in a civil war in the Koreth Imperium!
Interstellar Expanse - Coming Soon
Inspired by Charles Oines miniatures for the Aratouk, we’ve come up with a setting where the Interstellar League, fleeing something they aren’t talking about, have set up shop in a new region of space, bordered by the Karthian Domains, a warrior race driven by the transmigration of souls through the rigors of conflict, and the inscrutable Rulomani Republic, who fiercely defend their territories against all intruders.
Squadron Strike: Traveller - Coming Soon
The Wars of the Third Imperium are handled in High Guard for large fleet actions. There are plenty of other battles that require a finer scale with more detail per ship, and Squadron Strike: Traveller provides that detail, while bringing Traveller space combat into fully realized 3D vector movement.
Human Diaspora - Reboot Coming!
Post-human, post-scarcity humanity has expanded to the stars in a Diaspora that’s flavored by historical re-enactment, and a struggle over habitable and terraformable worlds. See the chaos and confusion when the Royal Rhodesian Navy encounters the Japanese Empire and the Russo-French Alliance in the depths of space!
The original Squadron Strike setting from the first edition will get a facelift, with all of the ships updated to the second edition rules.
Downloads
Movement Cards

Copies of the movement cards from Squadron Strike. You need one of these per ship in your game.
Introduction to concepts in Squadron Strike. Great for introducing new people to the game.

A copy of the reference card from Squadron Strike, complete with a mini Range Altitude look up table, sequence of play and more.